Wednesday, April 24, 2013

Easy Peasy-Extra Cheesy Baked Spaghetti


Easy Peasy-Extra Cheesy Baked Spaghetti


Adapted from Healthy Baked Spaghetti


Ladies and Gents, my apologies for taking so long to post here. However, your waiting was not in vain, because boy, do I have a winner for you!

I will be the first to admit that I wasn't the biggest fan of baked spaghetti...until now. Maybe it's because I remember it always being dry or covered in grease. That's not the case with this recipe! Here it is:

Serves 6--freezes well!

Ingredients:
1/2 lbs ground pork
1/2 lbs extra lean ground turkey (99% fat free)
1 medium/large white onion, chopped
6 oz whole wheat thin spaghetti
2 t olive oil
1 jar of light tomato basil pasta sauce (I used Ragu no sugar added)
1 cup 2% shredded cheddar cheese, divided
1/4 cup shredded parmesan cheese
2 t italian seasoning
2 t parsley
1-2 t oregano
1/2 t crushed red pepper (optional)
2 t garlic powder
1/2 -1 t black pepper
salt, to taste (optional)

Method:

Preheat oven to 375
1. In a large pot, prepare pasta according to the instructions on the box; drain and return to pot.


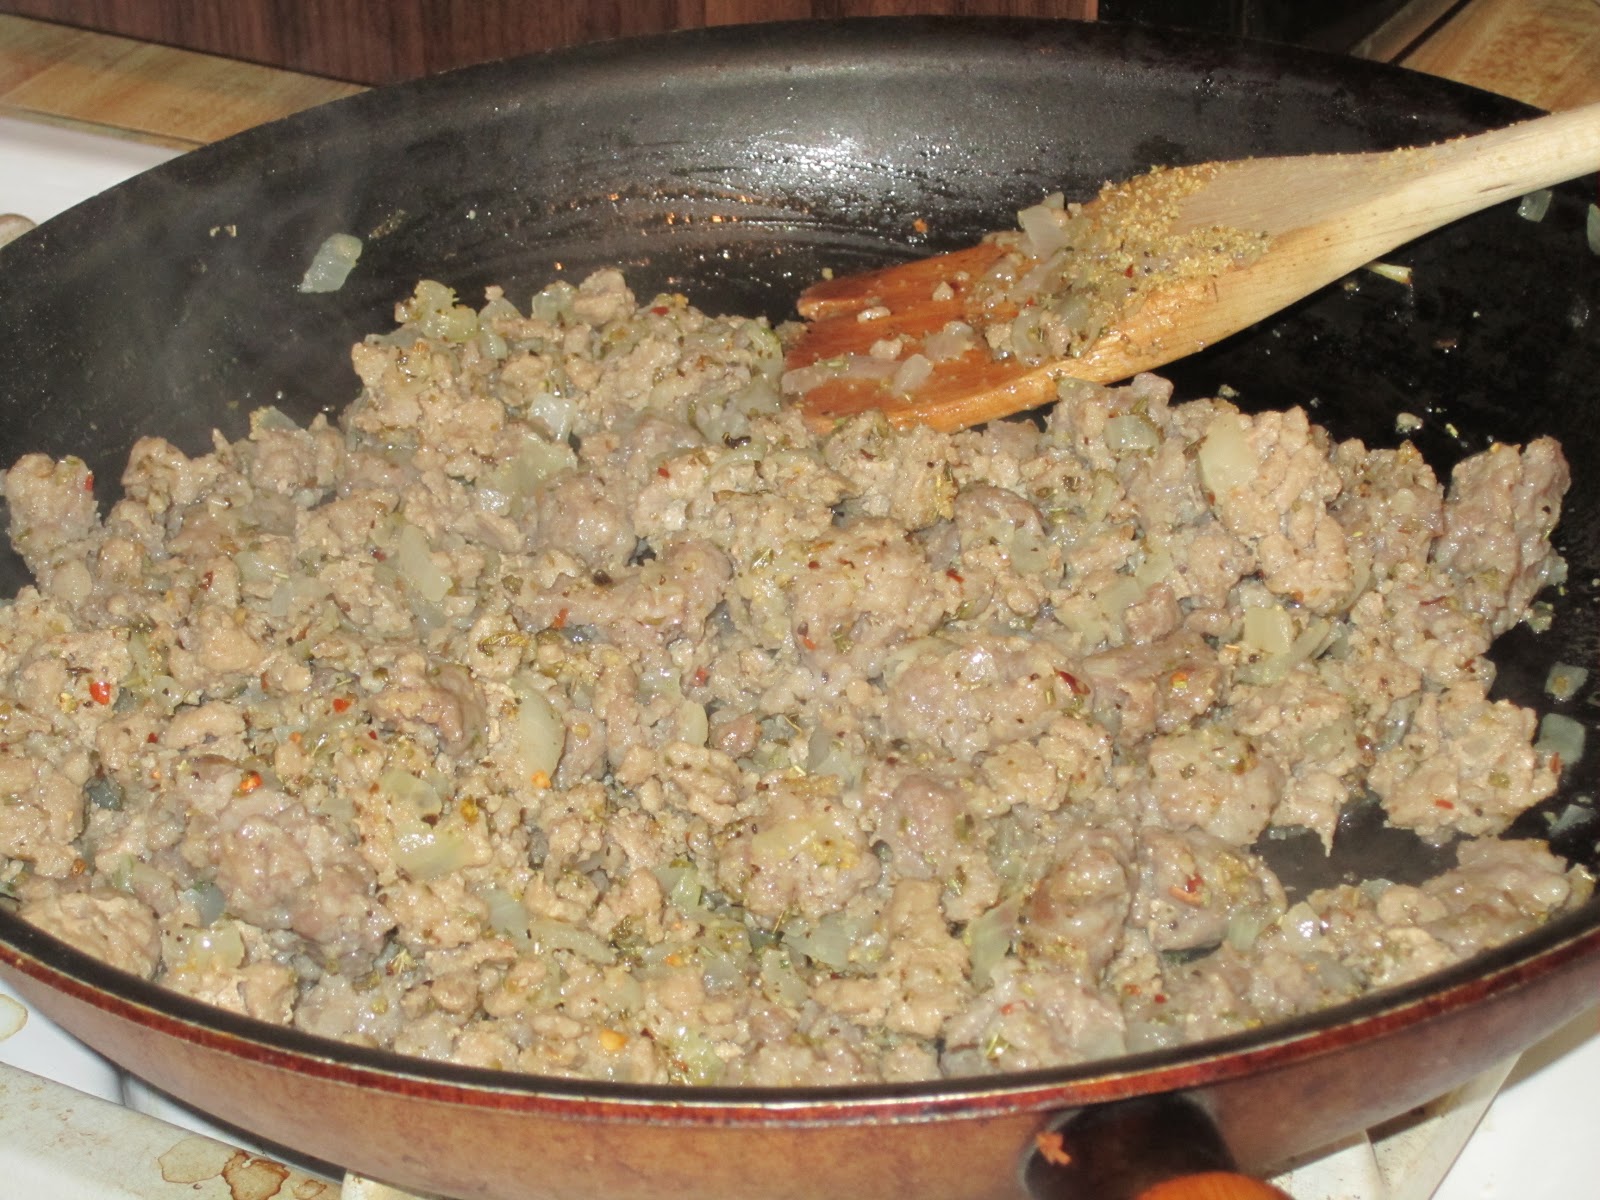
2. Heat olive oil in a large skillet over medium heat.  Add in onion and cooked for 2 minutes, or until almost soft.  Add in both meats, breaking it up until browned/cooked through.


3. Add in all of the seaonsings to the skillet. Mix well, and cook with meat for a few minutes.


4. Pour tomato basil sauce into the pot with the spaghetti. Mix to coat. Turn the heat up to medium, and allow flavors to "get to know one another."


5. Add meat/onion mixture into the pasta pot.  Toss and combine thoroughly.


6. In a large, well greased baking dish (I used 13x9), spoon half of the pasta mixture--making sure you form a fairly even layer. Sprinkle 1/2 cup of the cheddar cheese on top.


7. Spoon the remaining pasta mixture over the cheese, until completely covered.  Spinkle top with the remaining 1/2 cup of cheese. Sprinkle the cheddar cheese with the parmesan cheese.


8. Cover the baking dish loosely with aluminum foil. Be careful that it doesn't touch the cheese! You want to keep all of that cheesy goodness on the pasta :) To facilitate this, you can spray the foil with cooking spray, if you wish.


9. Bake at 375 for 20-25 minutes, or until bubbly.  Let the dish stand 5 minutes before serving.

Serve with a nice salad. Enjoy!

Nutritional Information (calculated on myfitnesspal.com)
**nutritional information may vary based on your ingredients**
Per serving:
Calories: 394
Fat: 18
Carbs: 31
Protein: 28
Fiber: 6


Weight Watcher Information (calculated on weightwatchers.com)
**points may vary based on your ingredients**
Per serving: 10pt+


All pictures are mine, so don't be a thief. After all, no one likes a thief. Also, if you reference this recipe, please attach a link back to my blog! :)


Friday, January 18, 2013

Fancy Pants Banana Puddin'


Everyone loves banana pudding. Well, at least the people I trust love banana pudding. We all know the classic recipe. You know, the kind made with those 'nilla wafer cookies.  Not the case here, friends!  I tossed the wafers for decadent, butter cookies. Don't worry though, this recipe won't expand your waistline. Although, I suspect if you inhale the whole dish, it just might :)  Moderation, right?

Make this dish. You will become a rockstar at your next brunch or other get together. Heck, make it for Sunday dessert!


Oh, in case you were wondering....Yes, I purposefully left the "g"  off in "pudding."  Alright, enough talking. Let's eat!


Fancy Pants Banana Puddin'
 
Ingredients:
2 bags of butter cookies (I used Pepperidge Farm Chessman cookies!)
Approx 6 nanners (aka bananas), sliced
2 cups skim milk
1 (5 oz) box of French vanilla pudding
1 (14 oz) can of fat free sweetened condensed milk
1 (8 oz) block of reduced fat cream cheese or neufchatel, softened.
1 (8 oz) container of fat free whipped topping, thawed
 
Method:
1. Arrange cookies (approx 1 bag) along the bottom of a large dish (13x9, although I used a rather oddly shaped one about the same size).


2. Add the sliced bananas, and spread evenly over the cookies.


3. In a medium bowl, add the milk and pudding mix.  Beat with electric mixer until well blended. Set in fridge.


4. In another bowl, combine the cream cheese and sweetened condensed milk.  Mix until smooth.


5. Fold whipped topping into cream cheese mixture.


6. Remove pudding mixture from fridge.  Fold cream cheese mixture into pudding mixture. Stir well.


7. Spread mixure over the bananas. Even out the top.
 
 
8. Cover pudding with remaining cookies.  You don't have to get fancy, but I like to try and alternate the patterns. Believe me, you'll rake in the compliments on the presentation!


9. Cover & chill until ready to serve.  
 
Other information:
Serves 12-20  Bless your heart if you get more servings out of this pudding :)
 
Weight Watchers Points Plus:
 
For 12 servings: 10 points plus
For 13 servings: 10 points plus
For 14 servings:  9 points plus
For 15 servings:  8 points plus
For 16 servings:  8 points plus
For 18 servings:  7 points plus
For 20 servings:  6 points plus
 
**Points based on manual imput into the recipe builder function on the Weight Watcher site.  They are not official.**


Tuesday, January 1, 2013

Kickin' Quinoa Mac n' Cheese w/ Chipotle Chicken Sausage

Happy New Year!! Boy, 2012 sure did go by quickly! Anyone else feel like time just flies by as you get older? Where's the rewind button? ;-)  I hope you have a blessed start to 2013---check out the recipe below! It's a great way to kickstart your year with some healthful comfort food!!

Kickin' Quinoa Mac n' Cheese w/ Chipotle Chicken Sausage
 
Recipe adapted from Moni's Quinoa Mac n Cheese

Yes, the following recipe is quite a mouthful.  A mouthful of deliciousness, that is.  With ingredients like quinoa, and better for you chicken sausage, you won't have to deviate from your New Years resolution of losing weight....or simply just eating better. 

So you might be asking how this is healthy if it involves cheese.  Well, you can't have mac n' cheese without cheese!!! That's just wrong.  The star ingredient here is quinoa (prounced keen-wah).  Don't worry if you thought it was prounced KIN-OAH--that's how my dad thought it was pronounced. 

Why quinoa? Well, where to begin.
1. Quinoa is rich in fiber, and keeps you full.
2. Quinoa is chalk full of iron
3. It's a complete protein.  Do you know that it has all 9 essential amino acids? Well now you do.
4. Quinoa has riboflavin. (Yeah, I don't really know what that is either, but it improves enegery within brain & muscle cells.)

Need further convincing? Check out this article: 7 Benefits of Quinoa

Bottom line: Make this dish--it's fantastic! This dish is a great way to introduce quinoa to your family, or for yourself if you're not the sharing kind.

Ingredients:
1 tsp olive OR canola oil
1 medium onion, diced
1 can of diced green chiles, a little fluid drained off the top.
3/4 cup dry quinoa
2 links of chipotle & cheese chicken sausage (I used Johnsonville brand), sliced
1 glove of garlic, minced (or just a good T or two of the jarred stuff)
1 1/2 cups fat free, low sodium chicken stock
1 large egg
1/2 cup fat free milk
1 cup low-fat cheddar cheese, shredded
3 T of parmesan cheese
salt & pepper, to taste
pinch of crushed red pepper (optional)

Garnish (optional): extra cheese, scallions, salsa, sour cream, etc!

Method:

1. Heat oil in a thick bottomed medium-ish sauce pot over medium heat.  When oil is hot, add in onions & green chiles.  Cook for 3 minutes.  Add in the chicken sausage, and cook for another 3 minutes--or until onion is tender.

2. Stir in quinoa, garlic, salt & pepper, and crushed red pepper flakes (if using). Cook, uncovered, until quinoa starts to turn opaque (about 5 minutes).

3. Add in chicken stock. Cover and reduce heat to medium low (should be simmering). Cook for 15-20 minutes, or until most of the liquid has been absorbed. Remove from heat and let stand for 10 minutes.

4. Preheat oven to 350 degrees.  Generously coat a 8x8 or 9x9 inch dish with cooking spray. 

5. In a small dish, whisk together milk & the egg. Next, gently fold the egg mixture into the quinoa mixture. Add in the cheddar cheese, mixing well so that some of the cheese starts to melt.  Don't worry if it's a little "soupy." It will thicken/stand up in the oven. Pour into baking dish, sprinkling parmesan cheese over the top. Add more salt & pepper, if desired.

6. Bake for 30-35 minutes, or until the edges turn a pretty golden color.

Makes 4 generous servings.  Pairs nicely with a green salad.

Other information

8 WWpts+ per serving

Points calculated using the WW Recipe Builder on weightwatchers.com). Points may vary based on the different products used.

Sunday, December 23, 2012

Best Dishes and Christmas Wishes

I've neglected my blog for far too long. I suppose that's what happens when you get a "big girl" job, and actually have to do things besides cook ;-)  Not to worry, I'm back with some tasty additions that have been family approved! Check em' out!

This newest post is for a fantastic pie that was originally printed in the amazing Southern Living magazine.  For those of you that know me, you know that this is my FAVORITE magazine.  I've taken this delicious classic pumpkin pie with a twist and lightened it up.  Don't worry y'all, it's still Southern--and more importantly, it is still decadent.  Merry Christmas!


Black Bottom Pumpkin Pie
Recipe: Slightly adapted from Southern Living, November 2012
Relax, I know the ingredient list is long. It will be OK, I promise :) The only thing that this requires is time.

Ingredients:
1/2 cup pecans, chopped
1 cup graham cracker crumbs
1 T cinnamon
1 cup crushed ginger snaps (use your food processor)
1/2 cup light butter, melted
1 cup semi-sweet chocolate chips
1/2 cup hazelnut coffee creamer or fat free half and half
2 (1.4 oz) chocolate-covered toffee candy bars, finely chopped
3/4 cup white sugar
1/2 cup flour
2 large eggs
4 egg yolks
2 cups fat free milk
1 cup canned pumpkin (NOT pumpkin pie filling!)
1/2 T vanilla extract

Extras/Garnish: chocolate shavings, light cool whip

Method:

1. Preheat oven to 350 degrees.  Spread pecans (in a single layer) in a shallow pan (baking sheet works!). Bake for 8-10 minutes, or until they smell nutty & fragrant--stirring halfway through.  Cool for 10 minutes.

2. In a big bowl stir together graham cracker crumbs, ginger snap crumbs, cinnamon, and butter.  Add in pecans, stirring until blended.  Press into the bottom & up the sides of a lightly greased 10 inch pie plate.

3. Bake at 350 for 10-12 minutes, or until lightly browned. Transfer to wire cooling rack and cool completely. This will take approximately 30 minutes

Note: Can't find graham cracker crumbs? Use your food processor to crush up regular graham crackers! Easy peasy.

4. Microwave 1 cup semi-sweet chocolate chips and 1/2 cup creamer or half/half in a microwave-safe bowl at HIGH for 1 minute or until melted, stirring every 30 seconds. (You don't want to burn the chocolate.  Seriously, even I find that gross, and I LOVE chocolate!).  Spoon the chocolate into the bottom of the pie crust; sprinkle the crushed candy bars over the chocolate mixture. Cover and chill for 1 hour, or until chocolate layer is set.


5. While the chocolate is setting up, whisk together sugar and flour in a heavy 3 qt saucepan; add eggs, egg yolks, and milk, and whisk until blended. Cook over medium heat, whisking constantly, 8 to 10 minutes  or until a pudding-like thickness. Be on the lookout! Mixture will just begin to bubble and will hold soft peaks when whisk is lifted.  Remove from heat, and whisk in pumpkin & vanilla extract.  Transfer to a bowl. Place heavy-duty plastic wrap direct on the mixture (to prevent a film from forming). Chill 30 minutes -1 hour.


6. Spoon over chocolate layer; cover and chill for 8-24 hours, or until filling is firm. The longer the better!

 
7. Serve with cool whip & chocolate shavings


ENJOY! Share a slice with someone you love--or just save it for yourself; that's your call :)

Serves 12-20

12 servings: 11 WW points plus, per slice
14 servings: 10 WW points plus, per slice
16 servings: 8 WW points plus, per slice
20 servings: 7 WW points plus, per slice

**calculated with the WW recipe builder**

Sunday, August 12, 2012

Chili-Lime Pork Tenderloin


They say good things come to those who wait.   I have never particularly liked that phrase.  You see, I'm not a very patient individual....but then again, how many of us REALLY are?? Anyway, I digress... You didn't come here to read by ramblings about that.

Anyway, this recipe requires a little patience. However, the pay off (i.e. party in your mouth, compliments out the wazoo, etc. ) is BIG.  Don't let a case of impatience keep you from trying it out.

It combines all of the things that life should be into one tasty dish: savory, sweet, and a bit spicy to keep it interesting.

Not a fan of pork? Really? I feel bad for you. (sarcasm).  No, in all seriousness, if you don't dig pork, try this marinade out on chicken or beef!

xo!

Chili-Lime Pork Tenderloin


Ingredients:

1 lb pork tenderloin
Zest of 1 lime
Juice of 1 lime (use the juice from the one you zested!)
1/4 cup honey
1 1/2 tsp salt
1/2 tsp garlic powder
1 chipotle chili pepper, chopped (canned, in adobo sauce)
1 tsp canola oil


Method:

Trim the pork tenderloin of any excess fat and silver skin.

For the marinade, combine zest through chili pepper in small, lidded jar. Shake well.


Place the pork tenderloin in a large resealable plastic bag with 1/2 of the marinade.

Refrigerate for 6 hours or overnight.

Reserve remaining marinade in a separate covered container to brush meat while cooking.

Heat grill to medium; brush with oil.
    Note: don't want to mess with brushing the grill? Dump the oil into the marinade!

Remove tenderloin from marinade.  Cook for 12-15 minutes, turning every 3-5 minutes, until the tenderloin reaches an internal temperature of 145F.  Brush reserved marinade over meat while cooking.

Remove from grill. Let met rest for 10 minutes prior to slicing. Refrigerate any leftovers (which there will be none!)

Serves 4


Other Information:

WW 5pp+ per serving

All pictures are mine, so don't be a thief.


I am not associated with Weight Watchers. All point values are unofficial.


Thursday, August 9, 2012

Spinach and Wild Mushroom Calzones


Spinach and Wild Mushroom Calzones

Ingredients

2/3 cup warm water
2 packets of splenda
1 envelope rapid rise active dry yeast
1 cup flour (prefereably bread flour), plus additional for rolling
1/2 cup whole wheat flour
1/2 t salt
1 medium onion
1/2 T dried oregano
1 T italian seasoning, divided
1 T of fresh garlic OR 1 t garlic powder
1/2 t pepper
3 cups wild mushrooms  (I used a cremini, shiitake, and oyster blend)
5 oz frozen spinach
1 cup part skim mozzarella cheese, shredded
6 T of tomato sauce (salt free), plus additional sauce for dipping

Additional ingredients/equipment: canola spray, a clean towel

Method:

Combine sugar, splenda, salt, yeast, bread flour, and whole wheat flour in a large bowl.  Pour in warm water, and mix.  Cover with a warm towel, and let rise for 35-45 minutes.


Meanwhile, spray a large saute pan with canola cooking spray.  Saute onion and oregano until soft.  Remove from pan, and set aside.


Add in mushrooms, 1/2 T italian seasoning, pepper, and garlic.  Cook 5 minutes. Add frozen spinach to the pan. Pour onions back into pan, cook until spinach is warm.


Divide dough into 4 equal pieces.  Flour surface. Roll each piece of dough into a 7in circle (or something resembling a circle). 


In a small bowl, mix 1/2 T italian seasoning and tomato sauce together. Add in additional salt, if desired.  Spread 1 1/2 T of tomato sauce over entire circle of dough.


Spread 1/4 c of cheese over each round of dough, on top of sauce.


Mound veggies on top of cheese.  Fold dough over and seal.


Repeat for remaining pieces of dough.


Transfer to a large baking sheet, sprayed and floured lightly with canola cooking spray.

Cover with a damp cloth and let rise for 30 minutes (this is a good time to preheat the oven--good way to utilize the heat)

Fill a large baking dish with water, and place on the bottom rack of oven.  On top oven, place calzones.

Bake at 400 degrees for 20 minutes, or until golden brown.

Serve with additional tomato sauce for dipping.  Ranch is also a very good option!


Serves 4

Enjoy!


Other Information

Inspired by Mushroom Calzones, from the Weight Watcher cookbook.

WW 6 pt+


All pictures are mine, so don't be a thief.

I am no way associated with Weight Watchers. All point values are unofficial, and are subject to human error.